

Getting Started
Configuring your school settings
Setting Up Your School Profile
Before you begin using Gosfem for your school, it is important to complete your school profile and basic system settings. These settings provide Gosfem with the information it needs to correctly identify your school, manage the academic session, display school information, and personalize different areas of the platform.
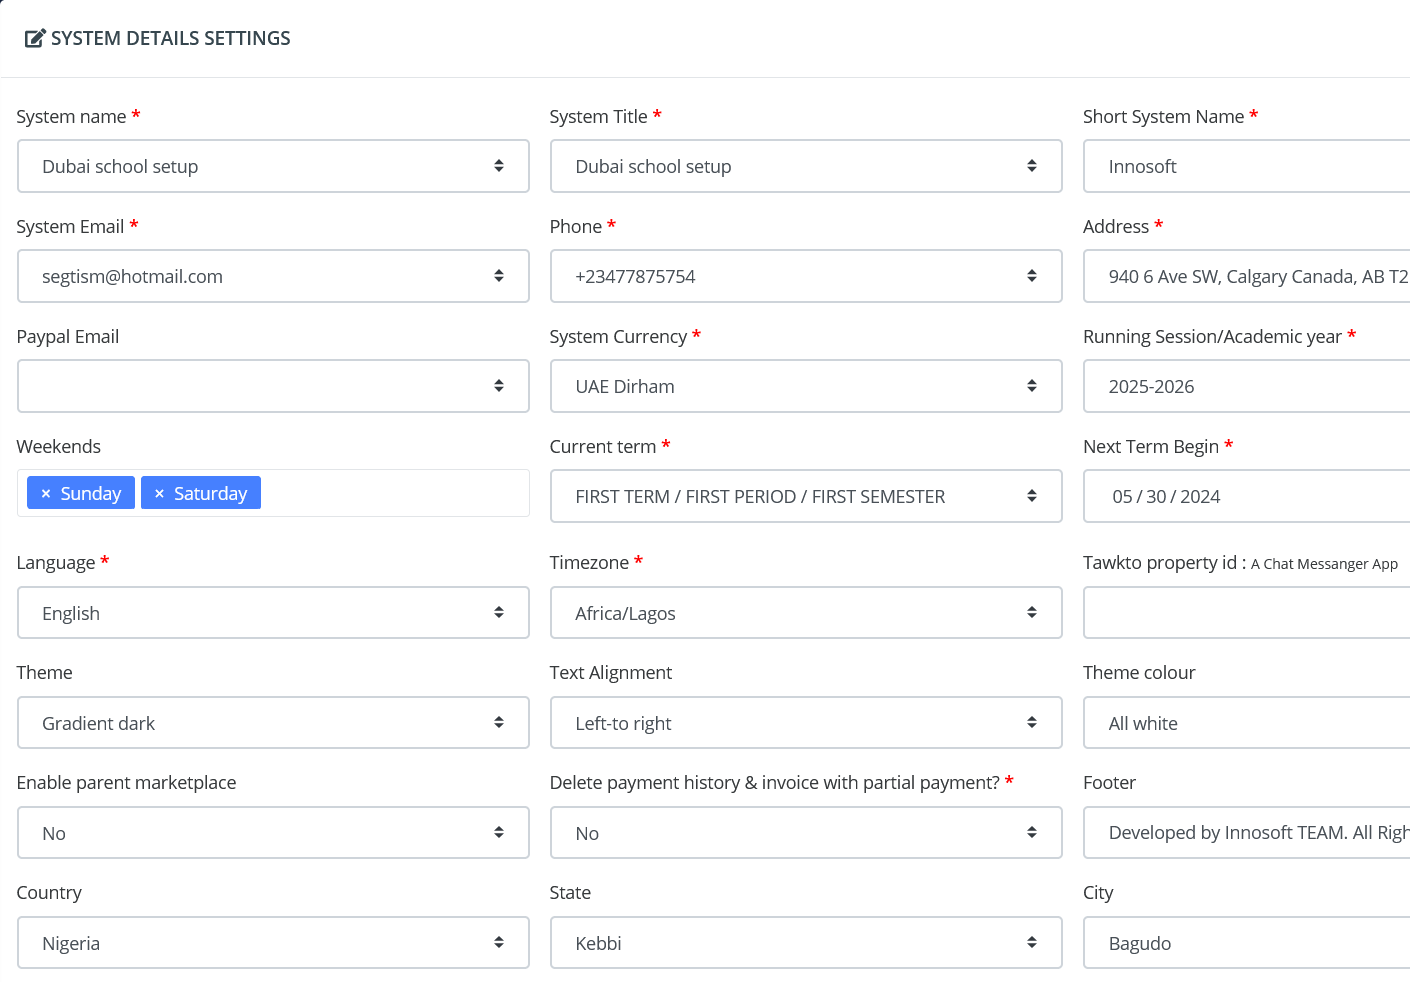
This setup only needs to be completed by a user with the appropriate administrative permissions.
Step 1: Open System Settings
From the Gosfem navigation menu, go to Basic Settings and click System Settings.
The System Settings page contains the main configuration options for your school. Take your time to review the available fields and enter information that accurately represents your school.
Step 2: Enter Your School Information
Enter your school's basic information in the appropriate fields. Depending on your Gosfem version and configuration, you may find settings such as school name, school title, school phone number, email address, address, country, state, city, and timezone.
These details may be used throughout Gosfem and can also appear on areas such as school documents, report cards, communication, and your school's public-facing information.
Step 3: Set the Current School Session
Select the current academic session for your school. The active session helps Gosfem organize academic records and activities according to the correct school year.
Make sure the selected session represents the academic year your school is currently using before adding or managing academic information.
Step 4: Set the Current Term
Select the current academic term for your school. The active term is important for activities such as attendance, examinations, results, report cards, and other academic records.
Whenever your school moves to a new term, make sure the current term is updated accordingly.
Step 5: Configure the Weekend
Select the day or days your school observes as the weekend. This setting can help Gosfem correctly handle school schedules and activities that depend on your school's working days.
Choose the option that matches your school's normal weekly schedule.
Step 6: Select a Report Card Template
Choose the report card template your school wants to use. The selected template determines how student academic results and report card information are presented when report cards are generated.
Review the available templates and select the one that best matches your school's reporting requirements.
Step 7: Set Your Currency
Select the currency used by your school for financial activities. This setting is important when working with invoices, payments, student ledgers, expenses, and other financial information.
Choose the currency that your school normally uses for its financial transactions.
Step 8: Review Your Location and Timezone
Set your school's country, state, city, and timezone correctly. These settings help Gosfem display and process information according to your school's location.
The timezone is particularly important because activities such as attendance, notifications, messages, scheduled activities, and system timestamps can depend on the configured timezone.
Step 9: Review and Save Your Settings
After entering the required information, carefully review the settings before saving them. Check that your school name, contact information, academic session, term, currency, location, timezone, and other important settings are correct.
Once you are satisfied with the information, save the settings.
Step 10: Set Up Your School Logo
After completing the System Settings, return to Basic Settings in the navigation menu and click Logo.
The Logo section allows you to personalize Gosfem with your school's branding. You can upload the images used in different parts of the platform.
Upload Your Light Logo
Upload your school's light logo for areas of Gosfem where a light-colored logo is required. Use a clear, high-quality version of your official school logo.
Upload Your Dark Logo
Upload your school's dark logo for areas where a darker logo provides better visibility. If your school has separate light and dark versions of its logo, upload the appropriate version for each field.
Upload Your Favicon
Upload your school's favicon. The favicon is the small icon associated with your website or web application and may appear in browser tabs and other browser interface areas.
For the best result, use a simple version of your school logo or another recognizable school brand icon that remains clear at a small size.
Upload Your Login Background Image
You can also upload a background image for the Gosfem login page. Choose a professional image that represents your school and works well with the login form displayed on top of it.
For the best appearance, use a high-quality image with enough visual space so that the login form remains easy to read.
Recommended Branding
For a professional-looking Gosfem installation, use consistent school branding across your logo, favicon, login background, website, report cards, and other school documents.
Make sure uploaded images are clear and properly prepared before adding them to Gosfem. Avoid extremely large image files because they may increase loading times.
Important: Keep Your School Information Up to Date
Your school profile is used throughout Gosfem, so it is important to keep the information accurate. If your school changes its name, contact details, location, branding, academic session, or other important information, return to the appropriate settings and update them.
School Profile Setup Checklist
Before moving on to other Gosfem configuration steps, make sure you have completed the following:
✓ School name and school title
✓ School phone number and email address
✓ School address
✓ Country, state, and city
✓ School timezone
✓ Current academic session
✓ Current academic term
✓ Weekend settings
✓ Report card template
✓ School currency
✓ Light logo
✓ Dark logo
✓ Favicon
✓ Login background image
What's Next?
Once your school profile and branding are configured, you can continue setting up the rest of your Gosfem environment. The next steps may include configuring academic classes and sections, subjects, students, staff, fees, attendance, examinations, communication, and other school-specific features.
Was this helpful?
Still need help?